AI Is Speeding Up Workflow—Without Replacing Humans
AI isn’t coming for your camera time. But it’s absolutely changing how fast and efficiently vloggers can plan, shoot, and publish. Tools like ChatGPT and Descript are cutting hours off scripting and editing. Need B-roll suggestions or a thumbnail caption? AI has answers—fast.
Still, there’s a line. Automation handles the grunt work, but your unique voice stays human. The best creators use AI to generate drafts, outlines, even quick jump cuts—but they review every line, tweak every transition, and stay on top of style. Viewers can smell robotic content from a mile away.
It’s not about cutting corners. It’s about using smart tools so you can focus on what matters: engaging your audience and making something worth watching. Adopt wisely, edit fiercely, and keep your personality front and center.
Introduction
Vlogging has taken a few hits over the years—algorithm changes, saturation, short-form chaos—but it’s proved one thing: the format isn’t going anywhere. If anything, it’s evolved into something tougher, tighter, and smarter. Vloggers who once relied on personality alone now need to think like producers, strategists, and community builders all at once.
What’s shifting in 2024? For starters, the old playbook is outdated. Audiences want more connection and less fluff. Platforms are rewriting how videos get ranked and discovered. And AI is no longer a buzzword—it’s a practical tool that’s reshaping the creative process. That said, the core stays the same: people come to vlogs for realness, for voice, for feeling like they’re part of something.
If you’re a creator, here’s the reality—you don’t have to do everything, but you do have to adapt. This year isn’t about making content for everyone. It’s about nailing your lane, knowing your tools, and showing up with intention. Because if vlogging has taught us anything, it’s that staying power doesn’t come from hype. It comes from consistency, evolution, and showing up—even when the rules change.
Micro-Niching for Loyal, High-Intent Audiences
In 2024, it’s no longer about trying to be everything for everyone. The creators who are winning are hyper-focused. Instead of “travel vlogs,” think “vanlife for single dads redefining family time” or “budget eco-travel for introverts.” Going narrow might feel risky, but it actually builds stronger communities. These aren’t passive subscribers—they’re people who show up, comment, and buy what you recommend.
When you hit a micro-niche, your content naturally improves. You speak directly to your crowd, not the algorithm. Your feedback loop tightens. You stop guessing what your audience wants—you already know, because you’re one of them.
This depth turns into dollars. Sponsors love a specific, loyal crowd. Merch and product drops land better. Long story short: fewer followers doesn’t mean less money. It often means more of the right money.
Micro-niching isn’t about shrinking your world. It’s about sharpening it.
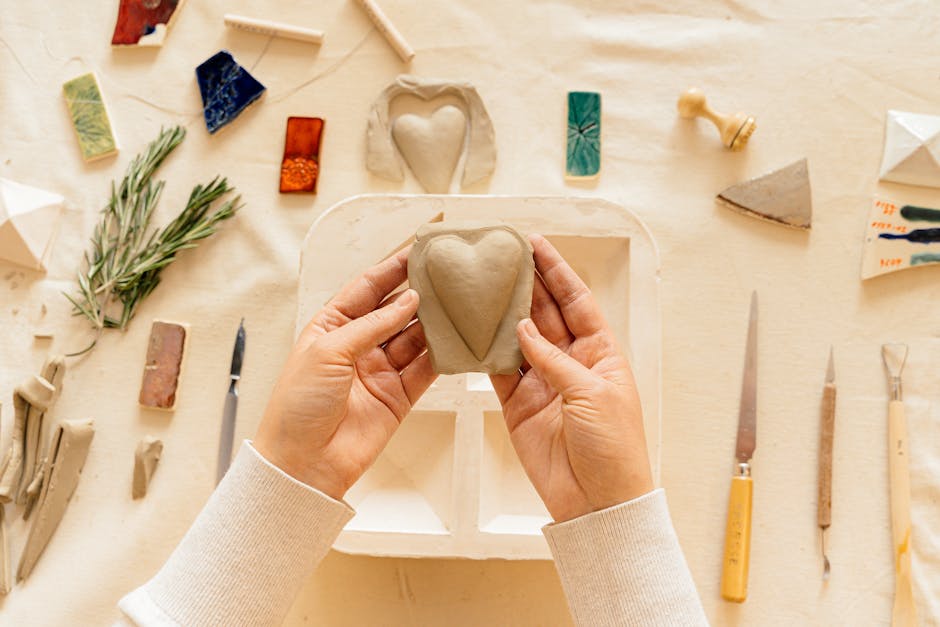
For Smoothing Surfaces and Refining Forms
Sculpting is all about the details, and when it comes to smoothing surfaces or refining the contours of your work, having the right tools makes all the difference. This stage usually comes after the piece has been roughly shaped, and it’s where you start dialing in the final texture, form, and character.
Tools That Deliver Finesse
Smoothing tools aren’t one-size-fits-all. Different materials and shapes offer different levels of control and precision.
-
Metal tools
-
Ideal for scraping, refining sharp lines, and smoothing hard-to-reach crevices
-
Provides more control when working with firm clays or adding fine structure
-
Rubber tools (also called shapers or soft-tip tools)
-
Excellent for gently blending surfaces without removing too much material
-
Especially effective on soft clay, wax, or when working close to finished detailing
When to Choose Metal vs. Rubber
The choice between metal and rubber comes down to intent and material.
- Go with metal when you need sharper definition, are smoothing hardened surfaces, or adjusting symmetry in structural areas.
- Choose rubber for subtle transitions, delicate blending, or fine-tuning facial details and curves.
Why Both Matter
Neither tool replaces the other—they complement each other. Rubber tools finesse what metal tools define. Keeping both types on hand ensures you’re prepared for every phase of refining your sculpture.
- Using both helps prevent overworking or damaging the material
- Alternating between them lets you switch from broad smoothing to fine detail
- They let you adjust pressure and control based on the stage of the sculpting process
If you’re just starting out with clay or sculpting, your toolkit matters—big time. The basics usually include wire loop tools, ribbon tools, spatulas, and shapers. Each serves a purpose. Wire loops and ribbon tools are your go-tos for trimming, hollowing, or carving away excess clay. Spatulas help push, smooth, and refine forms. Shapers give you control, especially when you’re working in tight spots or dialing in fine lines.
These tools aren’t just for looks—they’re what allow your hands to translate ideas into form. Good tools mean cleaner lines, more precision, and less frustration. Cheap tools can chip, bend, or just feel wrong over time.
When picking a starter set, skip the bulk packs with 20+ mystery pieces. Look for steel tools with wooden or rubber handles—anything that feels comfortable for long sessions. Pay attention to build quality and reviews. You don’t need every tool under the sun. You need a reliable set that lets you handle 80% of the work. Build from there.
Start simple, stay sharp.
Mastering Sculpting Techniques: Scooping, Subtracting, and Shapes
Effective sculpting goes well beyond adding material—it’s often what you remove that defines the form. Understanding foundational techniques like scooping, subtracting, and how different shapes suit various styles gives creators more control over their final outcome.
Core Techniques for Sculpting Accuracy
Getting familiar with these methods allows for both precision and creativity:
- Scooping: This involves carving out rounded or curved sections to create depth and dimension. It’s especially useful for organic forms and flowing contours.
- Subtracting: Focuses on removing larger material blocks to refine structure. Ideal for shaping angular forms or reducing volume efficiently.
- Hollowing: Creates lighter pieces by removing interior sections without compromising surface detail—important in ceramics and resin work.
Each technique contributes differently depending on your medium—whether clay, foam, wood, or digital modeling.
Choosing the Right Shape for Your Sculpting Style
The base shape you begin with dramatically influences the flow and feel of your sculpture. Here’s how to align your form with your creative intentions:
- Cylindrical bases: Best for character builds, torsos, or symmetrical forms. Easy to rotate and refine from all sides.
- Blocky shapes: Ideal for hard-edge sculpting, such as architecture, robotics, or stylized objects.
- Spherical forms: Great for facial features, natural elements, or anything requiring soft transitions.
- Flat planes: Useful as starting points for bas-reliefs or minimalist designs.
Pro Tip: Let the Shape Guide You
Don’t fight the form—embrace it. Choosing the right starting shape often saves time and leads to more satisfying results. Use your initial geometry as a roadmap for detail direction and balance.
Sculpt smarter by combining technique with intention, and find your unique rhythm in the creative process.
Fine point and micro-loop tools are made for precision—think of them as the scalpel and chisel of clay sculpting. These tools are essential when carving out sharp features like eyelids, nostrils, knuckles, or tiny folds in fabric. The key is to use them with control, not aggression. Let them slice or lift rather than dig.
Overworking happens when you keep going back, pressing too hard, or blending too much. With these tools, less is more. Make a pass, assess, and then stop. Sharp features pop because of contrast and tension—not because they’re fussed over. If you’re smoothing what should be crisp, you’re losing the impact.
Use fine point tools to define edges, but don’t overmark. Micro-loops help with shallow subtractions—removing just enough to create depth without gouging. A good rule: one clean cut beats five messy scratches. Step back often; details look different at a distance.
Whether you’re sculpting for the camera or the collector, staying deliberate keeps your forms alive.
Working at multiple angles is a must for vloggers shooting solo, but it doesn’t mean you need a gear closet full of cameras or a background in cinematography. The key is smart positioning—using lightweight tripods, portable mounts, or even stable household items to get varied shots that don’t compromise your setup. Tilt your angles slightly, switch up distances, and mix static frames with subtle motion. It creates variety without over-editing or making your space look cluttered.
As for turntables—those slow, rotating platforms that add a polished look to product shots or B-roll—there are now plenty of compact, budget-friendly options. Beginner vloggers don’t need to drop serious cash. Look into USB-powered models or battery-operated versions that come in under $50. They’re simple, lightweight, and get the job done. Whether you’re featuring a tech unboxing or showcasing handmade crafts, a steady 360 is often all you need to add production value.
Protecting Your Workspace and Clay
Creating polymer clay pieces requires more than just artistic vision—it also demands a clean, well-prepared workspace. The right surface and environment can make the difference between a polished result and a frustrating mess.
Choose the Right Surface
Non-stick surfaces are essential when working with polymer clay. They ensure your pieces lift off easily and help prevent shape distortion while you work.
Recommended non-stick surfaces:
- Glass: Smooth, sturdy, and heat-resistant—ideal for conditioning and shaping.
- Acrylic sheets: Lightweight and easy to clean, a solid option for beginners.
- Silicone mats: Flexible, non-slip, and easy to roll up for storage.
These surfaces are not only easy to work on, but they also double as baking surfaces if oven-safe.
Maintain a Contamination-Free Workspace
Polymer clay easily picks up dust, lint, and dyes from other materials. A clean space helps your work stay looking crisp and professional.
Tips for keeping your work area clean:
- Wipe down your tools and surface with baby wipes or rubbing alcohol before starting.
- Keep separate areas for conditioning and shaping clay.
- Avoid wearing fabrics that shed easily (like wool).
- Consider using tape to pull off lint from the clay before baking.
A clean environment doesn’t just benefit your clay—it supports your creative focus and professionalism. By prepping your area thoughtfully and using proper surfaces, you ensure a smoother, frustration-free crafting process.
Keeping clay in a useable state is about balance—too dry and it cracks, too wet and it turns to a slippery mess. The sweet spot is a moist but firm body that holds its shape while staying responsive to your hands.
First rule: don’t let it dry out. Store your clay in airtight containers or wrap it tightly in plastic with a damp cloth. If you’re mid-project and need to pause, cover your piece with plastic wrap and lightly mist it to maintain moisture.
When rehydrating clay that’s starting to stiffen up, avoid dumping water straight on it—that’s a fast track to slippage. Instead, use a misting bottle or damp hands to slowly work the moisture in as you knead. For more stubborn chunks, seal them in a plastic bag with a few wet paper towels overnight. They’ll draw in just enough moisture to get you back on track without turning your workspace into a mudslide.
Bottom line: Work smart. Moisture control is less about dramatic fixes and more about steady habits. Stay on top of it, and your clay will stay ready.
How to Clean Different Types of Tools Properly
Whether you’re running a DIY vlog, a workshop channel, or just keeping your behind-the-scenes tidy, tool upkeep matters. Dirty or rusted gear wastes time and kills your credibility on camera. Here’s how to handle the basics with minimal fuss:
-
For metal tools (wrenches, screwdrivers, pliers): wipe off dirt with a dry rag first. Use a wire brush to clean out grooves or stuck grime. Then, hit them with a bit of WD-40 or light machine oil to prevent rust.
-
Power tools need a gentler hand. Unplug them first (for real), then use a can of compressed air or a soft brush to knock dust out of vents. For gunked-up areas, a damp cloth with mild soap works. Skip the soaking—moisture is the enemy here.
-
Wooden handles? Sand lightly to smooth out splinters. Then seal with linseed oil or furniture wax to keep them from drying out and cracking.
Simple Setups for Organizing Your Toolkit
You don’t need a flashy background full of gadgets—just a setup that keeps you moving. Start with a basic pegboard. Hang the tools you use most—yes, in reach of arm’s length. Organize by category: cutting, fastening, measuring. Add labels if it helps speed things up during filming.
If you’re always on the move or shoot in different locations, invest in a modular toolbox with removable trays. Foam inserts help hold cameras, mics, and tripods securely without rattling around.
Bottom line: a clean, organized toolkit saves time, looks sharper on camera, and tells your audience you know what you’re doing—even before you hit record.
Digital sculpting tools like ZBrush and Blender have completely changed how artists refine their craft. Armed with just a stylus and tablet, creators can block out forms, test compositions, and fine-tune details in a matter of minutes—an instant feedback loop that traditional clay can’t match. These programs aren’t just about convenience. They’re training grounds.
Working in digital forces you to think in layers: structure, proportions, gesture, and surface detail. You can undo mistakes, iterate fast, and push shapes without worrying about wasting material. That level of experimentation builds instinct, sharpens your eye, and improves your hand—even when you switch back to physical sculpting tools. It’s not one or the other anymore. Artists who bounce between both mediums tend to grow faster. Digital practice is now part of a smart workflow—not just an optional side gig.
If you’re starting out or looking to sharpen your skills, 2024’s trend is clear: hands-on learning through direct content. Vloggers are embracing step-by-step guides, beginner-friendly projects, and tell-it-like-it-is tutorials. The fluff is gone. What remains is clear instruction, transparent mistakes, and usable takeaways. Viewers aren’t just watching—they’re building alongside creators.
There’s also a fluid approach to creativity gaining traction. More vloggers are cross-training between disciplines—think sculptors diving into printmaking or sketch artists leaning into digital texture work. The overlap doesn’t only make for more dynamic content; it expands what you bring back to your main craft. If you’re in the visual arts space, this guide hits the mark: Mastering the Art of Printmaking. Pair it with your base expertise and you’ve just leveled up.
Practical, tactile, and textured—that’s where the smart creators are headed.
Start Small, Stay Consistent
You don’t need a studio or a $2,000 camera to get started. Most creators making an impact in 2024 began with what they had: a solid phone, decent lighting, and content worth watching. Focus on the essentials—clear audio, a steady shot, and an idea that actually resonates. As you find your rhythm and your audience grows, then it makes sense to upgrade your gear.
But here’s where most people fall off: consistency. The biggest asset you have isn’t equipment—it’s repetition. Weekly uploads, daily check-ins, or even a focused monthly drop. It’s a long game, and the creators who keep showing up, even when the numbers are underwhelming, are the ones who break through. Talent helps, but time sharpens talent into mastery.
 Johner Hazardics writes the kind of art movement highlights content that people actually send to each other. Not because it's flashy or controversial, but because it's the sort of thing where you read it and immediately think of three people who need to see it. Johner has a talent for identifying the questions that a lot of people have but haven't quite figured out how to articulate yet — and then answering them properly.
They covers a lot of ground: Art Movement Highlights, Essential Techniques and Tools, Art Exhibitions and Reviews, and plenty of adjacent territory that doesn't always get treated with the same seriousness. The consistency across all of it is a certain kind of respect for the reader. Johner doesn't assume people are stupid, and they doesn't assume they know everything either. They writes for someone who is genuinely trying to figure something out — because that's usually who's actually reading. That assumption shapes everything from how they structures an explanation to how much background they includes before getting to the point.
Beyond the practical stuff, there's something in Johner's writing that reflects a real investment in the subject — not performed enthusiasm, but the kind of sustained interest that produces insight over time. They has been paying attention to art movement highlights long enough that they notices things a more casual observer would miss. That depth shows up in the work in ways that are hard to fake.
Johner Hazardics writes the kind of art movement highlights content that people actually send to each other. Not because it's flashy or controversial, but because it's the sort of thing where you read it and immediately think of three people who need to see it. Johner has a talent for identifying the questions that a lot of people have but haven't quite figured out how to articulate yet — and then answering them properly.
They covers a lot of ground: Art Movement Highlights, Essential Techniques and Tools, Art Exhibitions and Reviews, and plenty of adjacent territory that doesn't always get treated with the same seriousness. The consistency across all of it is a certain kind of respect for the reader. Johner doesn't assume people are stupid, and they doesn't assume they know everything either. They writes for someone who is genuinely trying to figure something out — because that's usually who's actually reading. That assumption shapes everything from how they structures an explanation to how much background they includes before getting to the point.
Beyond the practical stuff, there's something in Johner's writing that reflects a real investment in the subject — not performed enthusiasm, but the kind of sustained interest that produces insight over time. They has been paying attention to art movement highlights long enough that they notices things a more casual observer would miss. That depth shows up in the work in ways that are hard to fake.